If you don’t have the time to figure this out on your own, we would love to help you get it done quickly.
The following tutorial assumes basic knowledge of Salesforce, login, setup, etc. The tutorial shows the basic steps to enter the data into the needed screens, but will not detail every click or keystroke.
With the impending forced migration to the Lightning environment, many companies are struggling to find a solution to clone opportunities that INCLUDES the product lines. This tutorial shows how it CAN be done without having a more expensive license (required to apply the automated fixes available.)
How will this work?
We want a fully formed Salesforce Flow that will be called from a button placed on the Opportunity screen. When a user pushes the button while looking at an Opportunity:
- A cloned copy of the current Opportunity is created
- The newly created Opportunity has the old Opportunity Name with “Clone – ” appended. (Example: ‘Opportunity A’ becomes ‘Clone – Opportunity A’)
- The newly created Opportunity has the Close Date replaced with current date
- All other specified data fields (both header and product line) should be copied from the source Opportunity
- The user should then view the recent Opportunities from the menu and edit the new Opportunity to correct the Opportunity Name and other data fields.
The tutorial steps shown are pretty bare-bones, but they successfully clone a Salesforce Lightning Opportunity with no custom coding. Every step can be changed or re-done a different way. Add as many extra variables, value overrides, new decisions, screen elements, etc. as you like–Salesforce Flow is meant to be customized to fit your specific needs.
Legend for Notations on Screen Captures:
- Button clicks or actions (typically with a mouse) use a RED highlighter to show the action.
- Data that should be selected, entered, or chosen before data entry is completed are highlighted in YELLOW.
Special Note:
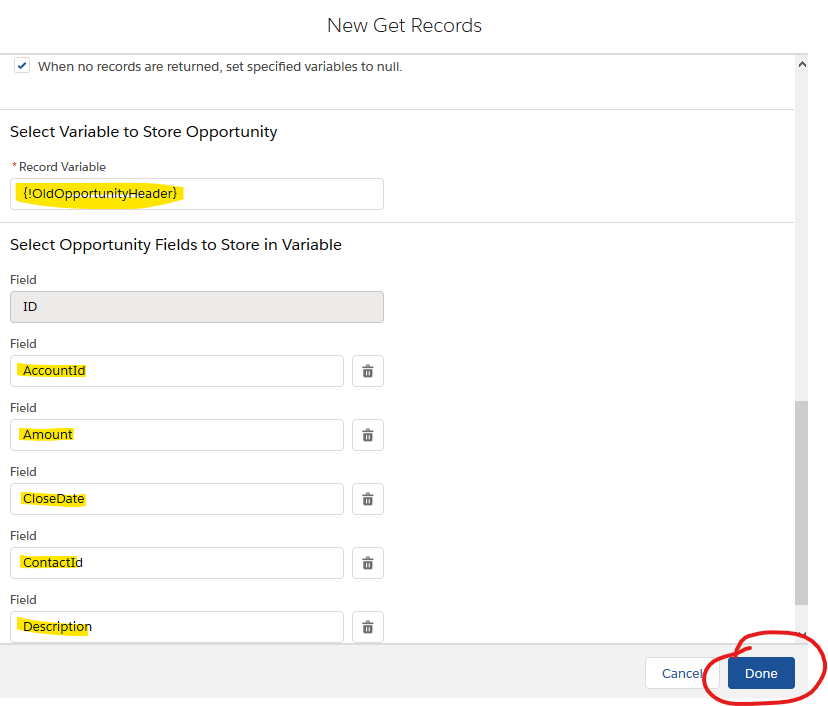
On the “New Get Records” screen for the Collect Header from Existing Opportunity flow connector, we recommend adding EVERY possible field in the “Select Opportunity Fields to Store in Variable” for the {!OldOpportunityHeader} variable.
If you don’t load it in the list, it won’t get copied. (Start by adding every field, and then remove only the data fields that don’t make sense to copy. You will likely need to add MOST of the fields anyway, so it’s usually easier to focus on removing irrelevant fields.)
If this seems daunting, please don’t hesitate to contact us. We would love to help you!
Let’s begin!
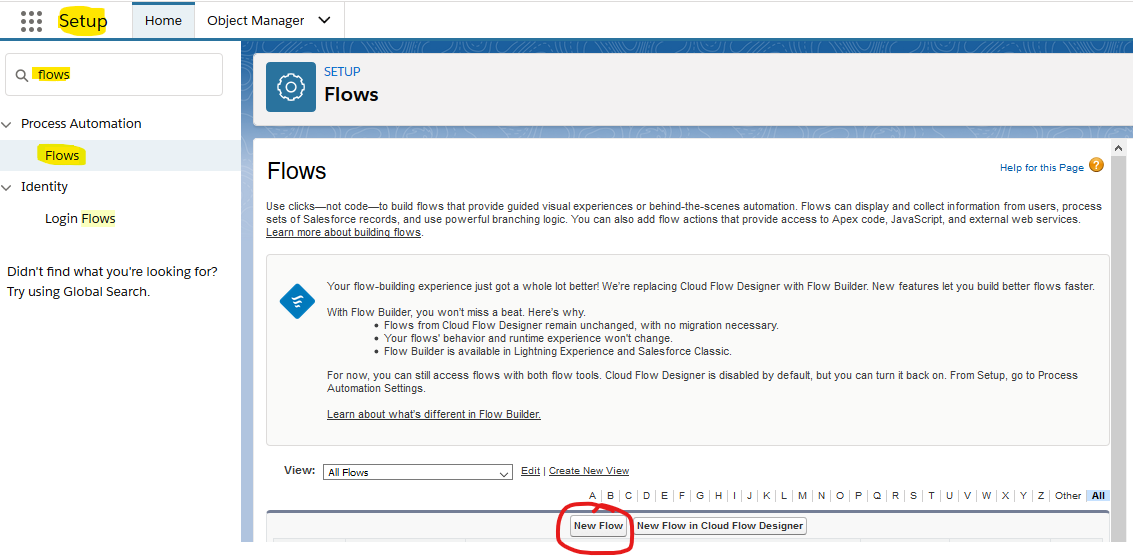
1. Create a Flow – The flow is the mechanism Salesforce uses to clone the Opportunity. From the Setup area, search for “flows”, and open the “Flows” screen under Process Automation. Use the “New Flows” button to launch:
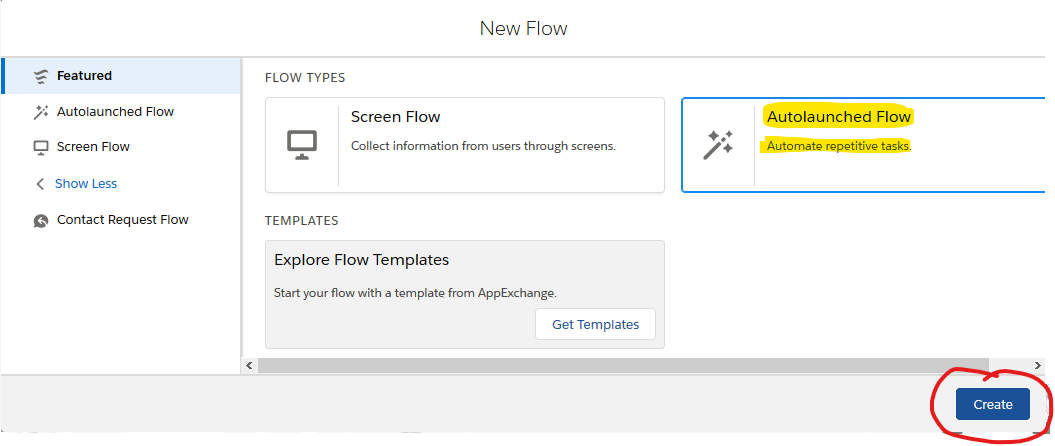
2. “Select Autolaunched Flow” and Create:
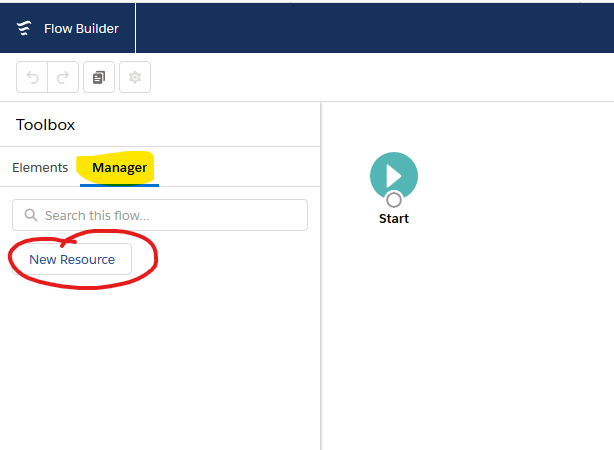
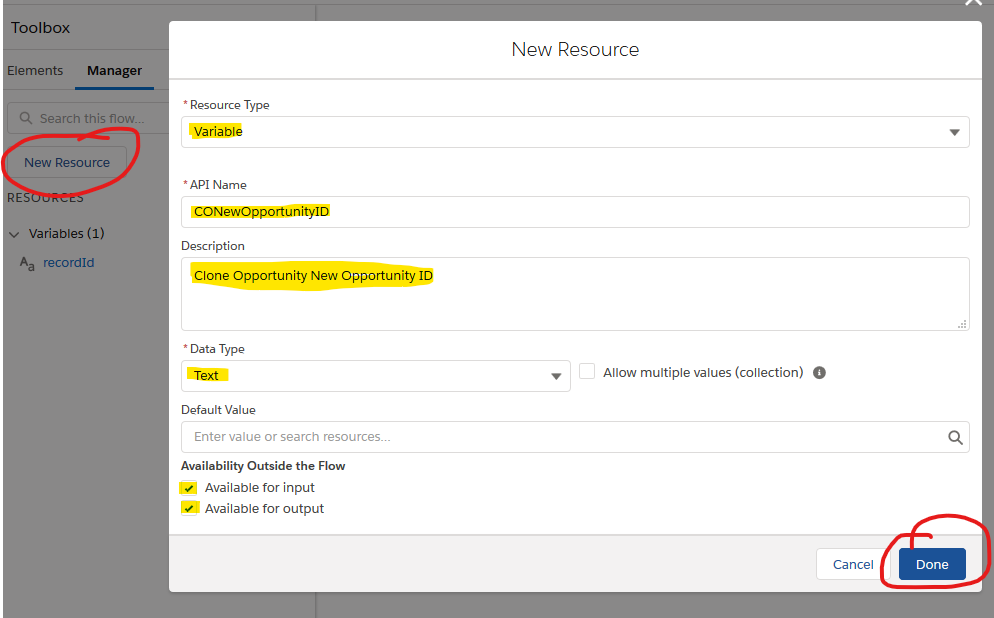
3. Create a new Variable for recordId (variable for holding the source Opportunity ID) – Choose the Manager tab in the Toolbox and click on “New Resource”:
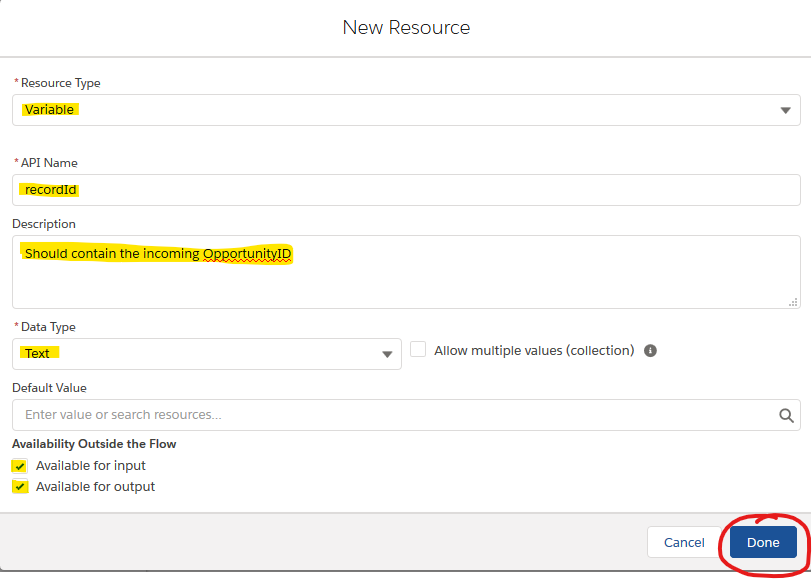
4. Enter the “recordId” variable information (pay attention to case on the variable name–if the variable name is not consistent in every step, it will not work properly…):
5. Create a new Variable for CONewOpportunityID (variable for holding the newly cloned Opportunity ID) – Choose the Manager tab in the Toolbox and click on “New Resource”, then enter the “CONewOpportunityID” variable information (pay attention to case on the variable name–if the variable name is not consistent in every step, it will not work properly…):
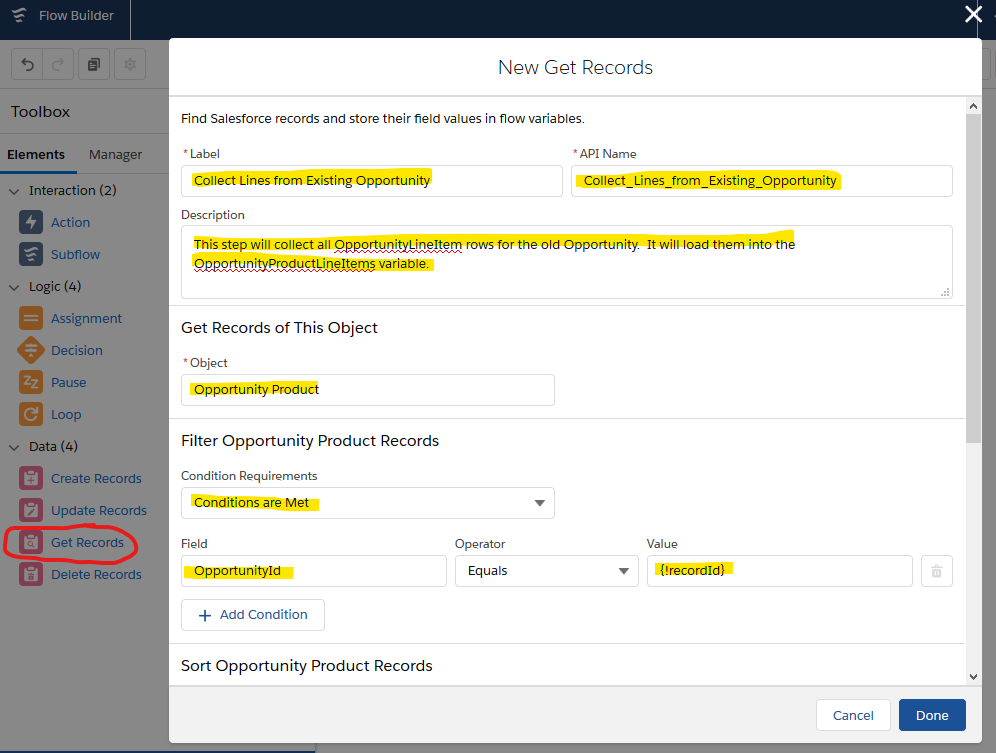
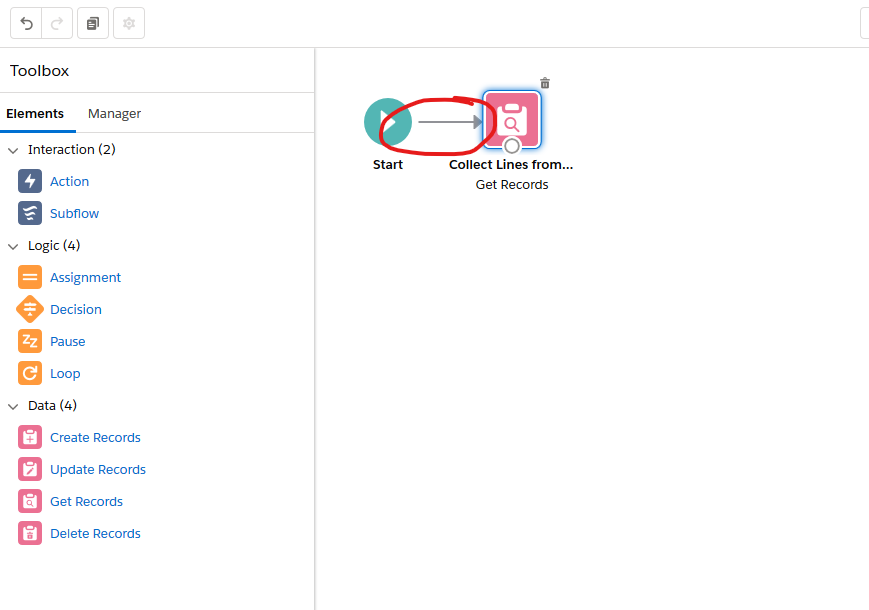
6. Create the first Flow connector by dragging switching to the Elements tab and dragging the Get Records connector to the canvas next to the Start connector. After dragging, enter the following data for “Collect Lines from Existing Opportunity” – this connector will collect the product lines from the source Opportunity in preparation for creating the new cloned product lines:
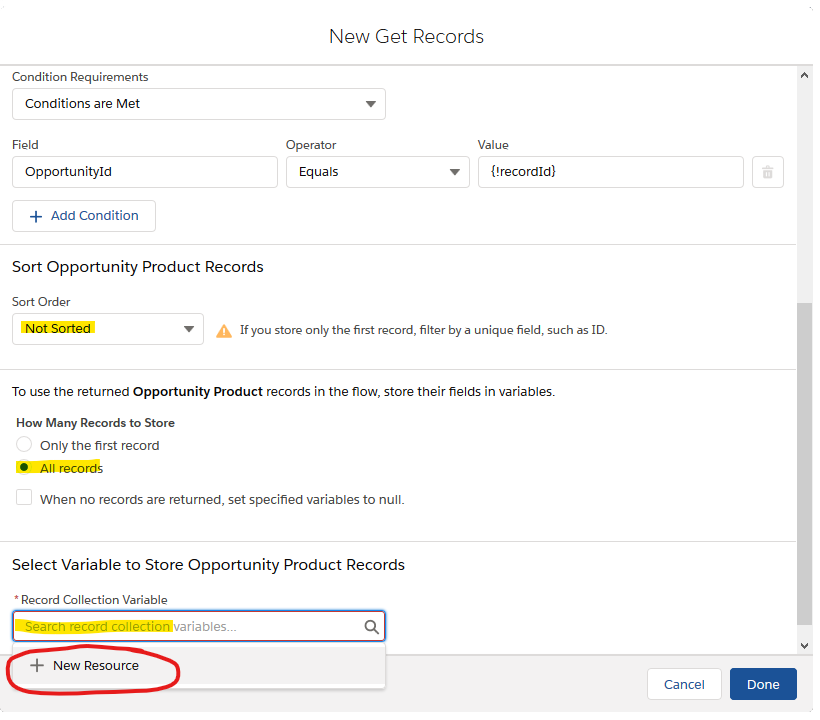
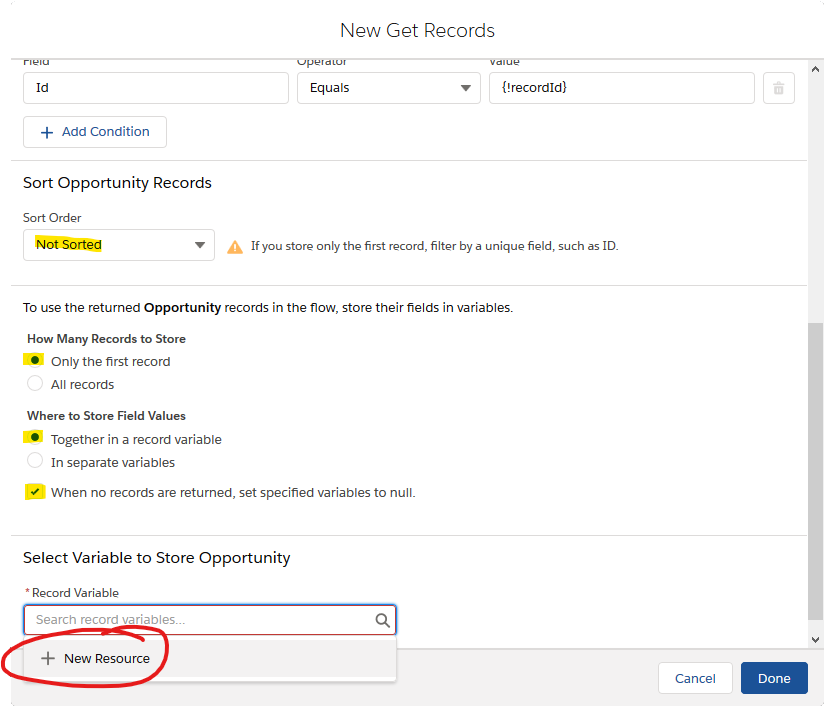
7. In the “Select Variable to store Opportunity Product Records” section, we need to create the variable because it’s not already on the list. Select “+ New Resource” to launch the screen:
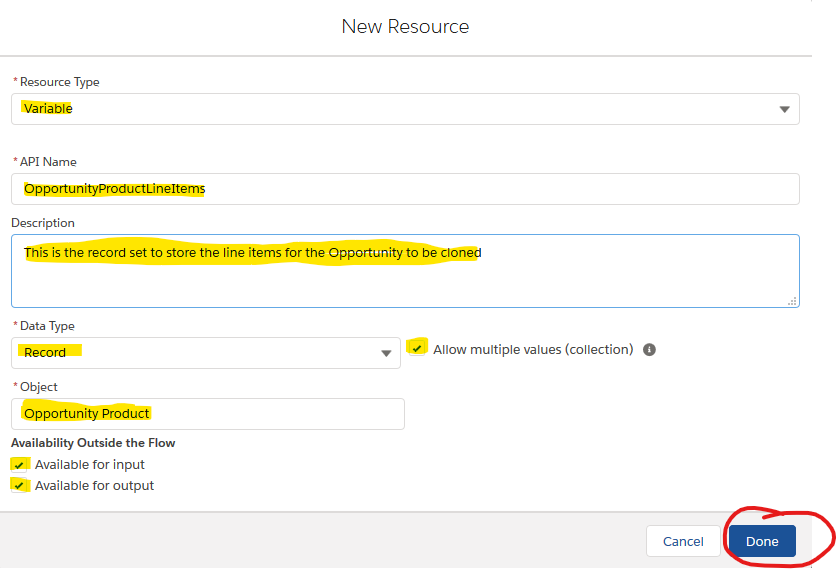
8. In the New Resource screen, we need to create the OppportunityProductLineItems variable to store the source Opportunity’s product lines:
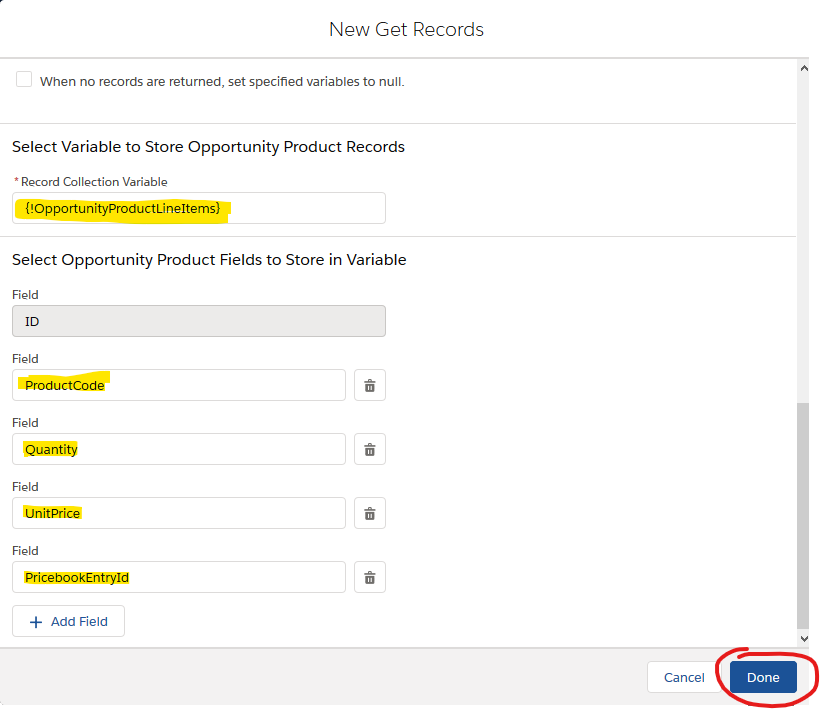
9. Now that the variable is created, on the New Get Records screen, select the OppportunityProductLineItems and choose all the line-level fields to clone (the list shown–ProductCode, Quantity, UnitPrice, PricebookentryId–is a minimum to recreate an order–more fields may be added to your specific needs…):
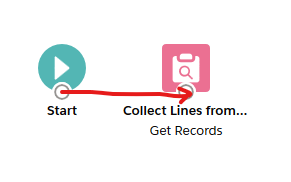
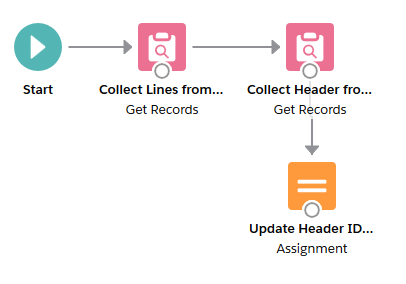
10. Once the Get Records connector is saved, you will see it on the canvas by the Start connector. Using your mouse, click/drag from the attachment point on the start connector to the attachment point on the new connector:
11. You should see a directional flow from Start to the “Collect Lines from…” connector:
12. Drag a new Get Records connector to the canvas beside the “Collect Lines from…” connector:
13. After dragging, enter the following data for “Collect Lines from Existing Opportunity” – this connector will collect all the data from the old Opportunity to prepare for cloning:
14. In the “Select Variable to store Opportunity Product Records” section, we need to create the variable because it’s not already on the list. Select “+ New Resource” to launch the screen:
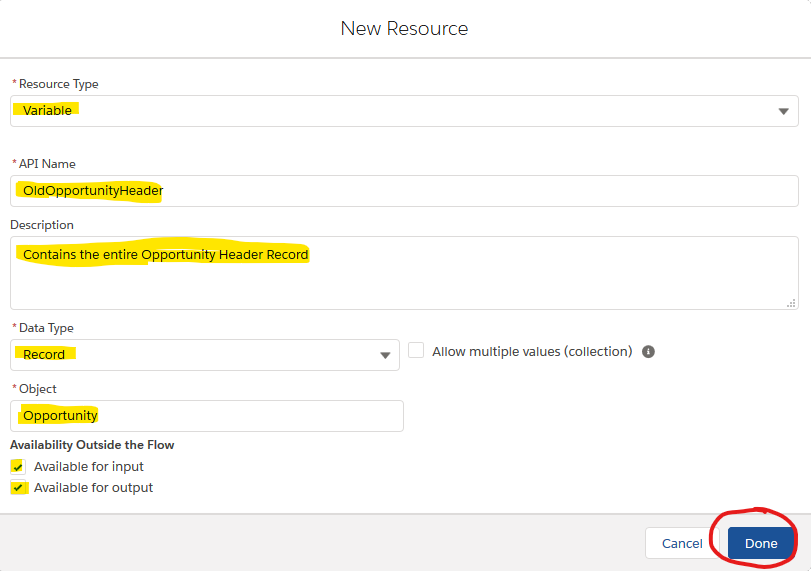
15. In the New Resource screen, we need to create the OldOpportunityHeader variable to store the source Opportunity’s header data fields to be manipulated before cloning:
16. After selecting the (newly created) OldOpportunityHeader variable, add all cloneable data fields to the list. Any field not explicitly selected will not get cloned (See ‘Special Note’ above for extra information…):
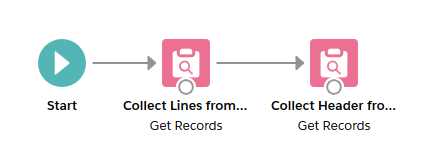
17. Once the Get Records connector is saved, you will see it on the canvas by the Start connector. Using your mouse, click/drag from the attachment point on the “Collect Lines from…” connector to the attachment point on the new connector:
18. You should see a directional flow from the “Collect Lines from…” connector to the “Collect Header fro…” connector:
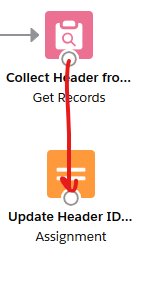
19. Drag a new Assignment connector to the canvas below the “Collect Header fro…” connector:
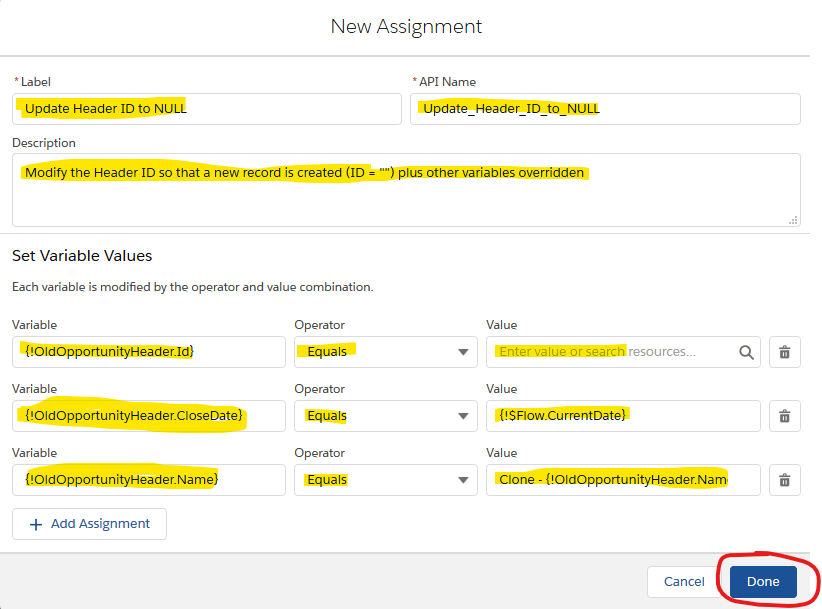
20. After dragging, enter the following data for “Update Header ID to NULL” – this connector will override the header data for ID, CloseDate, and Name in preparation for creating the new cloned Opportunity:
21. Once the Assignment connector is saved, you will see it on the canvas below the “Collect Header fro…” connector. Using your mouse, click/drag from the attachment point on the “Collect Header fro…” connector to the attachment point on the new connector:
22. You should see a directional flow from the “Collect Header fro…” connector to the “Update Header ID…” connector:
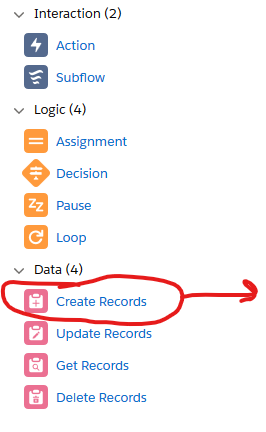
23. Drag a new Create Records connector to the canvas to the left and down from the “Update Header ID…” connector:
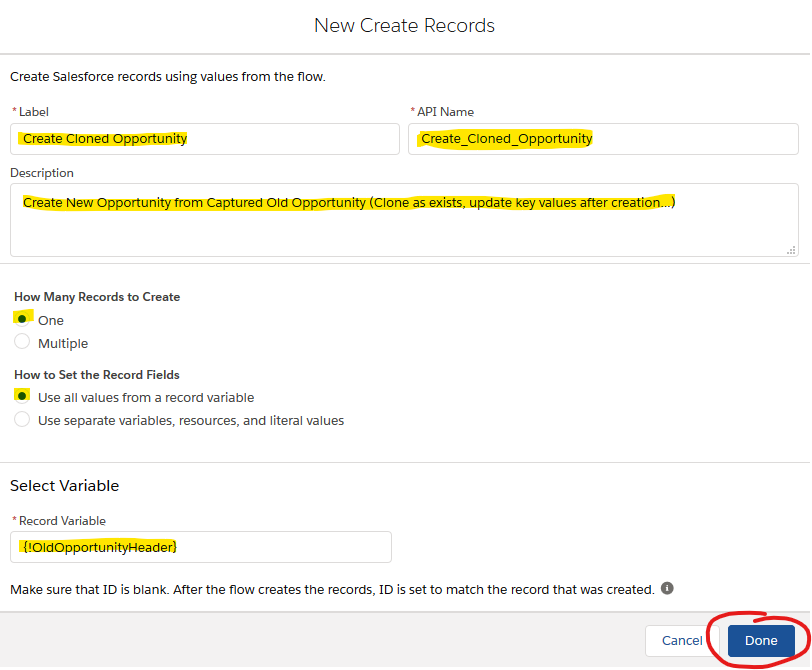
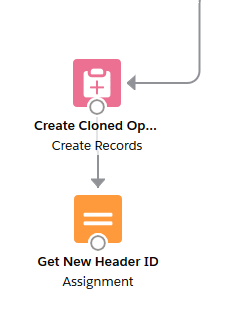
24. After dragging, enter the following data for “Create Cloned Opportunity” – this connector will create a cloned header using all the data from the old Opportunity, but because the OldOpportunityHeader.Id value was set to null, it gets a new ID (which is stored in a later step and passed to the line loop to attach to the newly cloned header):
25. Once the Create Records connector is saved, you will see it on the canvas below (and left) from the “Update Header ID…” connector. Using your mouse, click/drag from the attachment point on the “Update Header ID…” connector to the attachment point on the new connector:
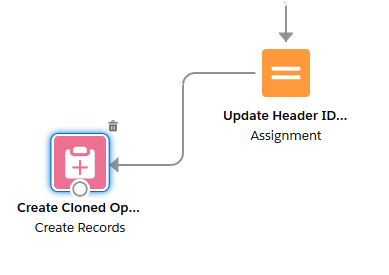
26. You should see a directional flow from the “Update Header ID…” connector to the “Create Cloned Op…” connector:
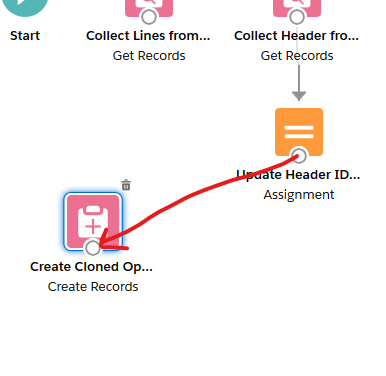
27. Drag a new Assignment connector to the canvas below the “Create Cloned Op…” connector:
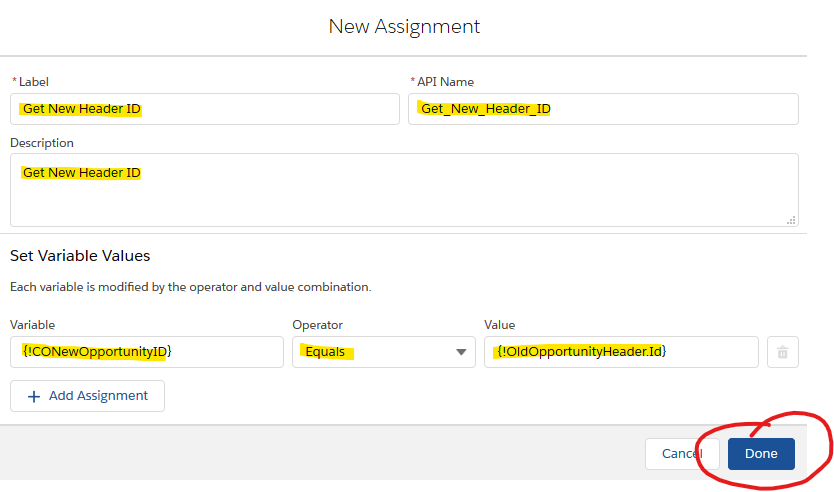
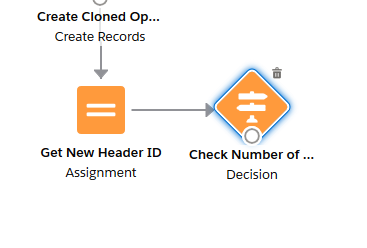
28. After dragging, enter the following data for “Get New Header ID” – this connector will collect the newly cloned Opportunity header ID value to pass to the loop that clones the product lines:
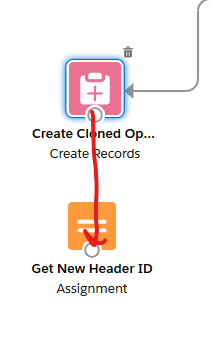
29. Once the Assignment connector is saved, you will see it on the canvas below the “Create Cloned Op…” connector. Using your mouse, click/drag from the attachment point on the “Create Cloned Op…” connector to the attachment point on the new connector:
30. You should see a directional flow from the “Create Cloned Op…” connector to the “Get New Header ID” connector:
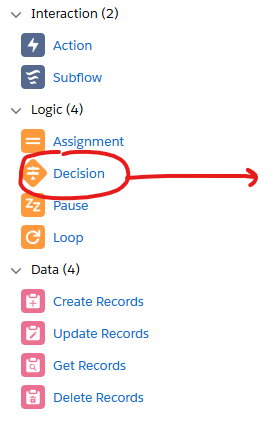
31. Drag a new Decision connector to the canvas to the right of the “Create Cloned Op…” connector:
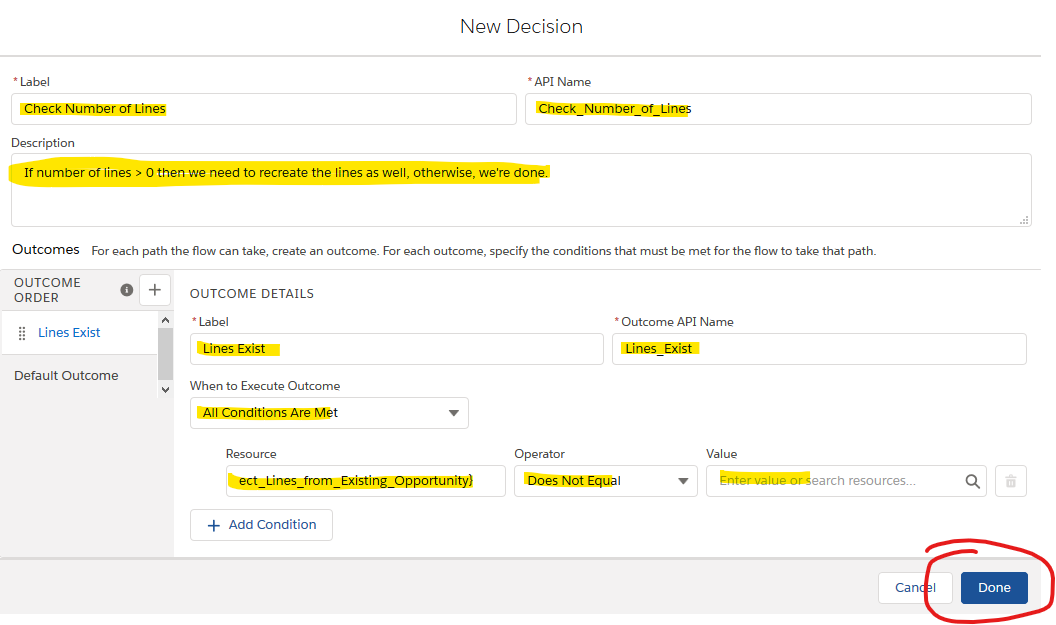
32. After dragging, enter the following data for “Check Number of Lines” – this connector will decide if there are product lines to consider–if not, then it’s done (if there are, then it enters the loop because “lines exist”):
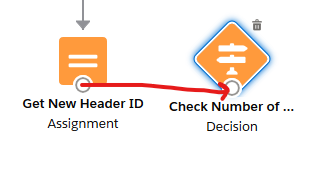
33. Once the Decision connector is saved, you will see it on the canvas to the right of the “Get New Header ID” connector. Using your mouse, click/drag from the attachment point on the “Get New Header ID” connector to the attachment point on the new connector:
34. You should see a directional flow from the “Get New Header ID” connector to the “Check Number of…” connector:
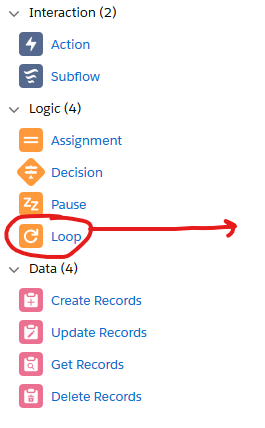
35. Drag a new Loop connector to the canvas to the right of the “Check Number of…” connector:
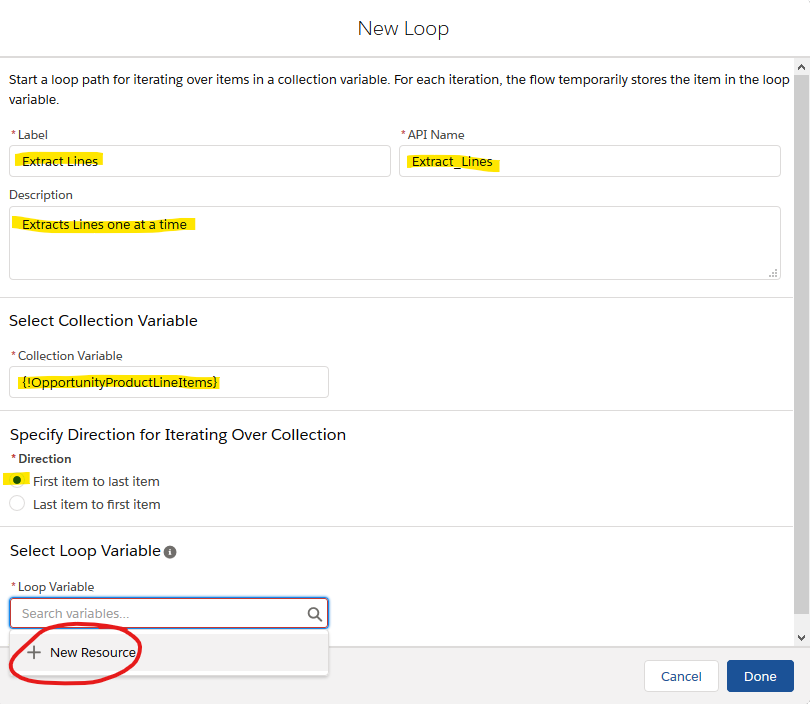
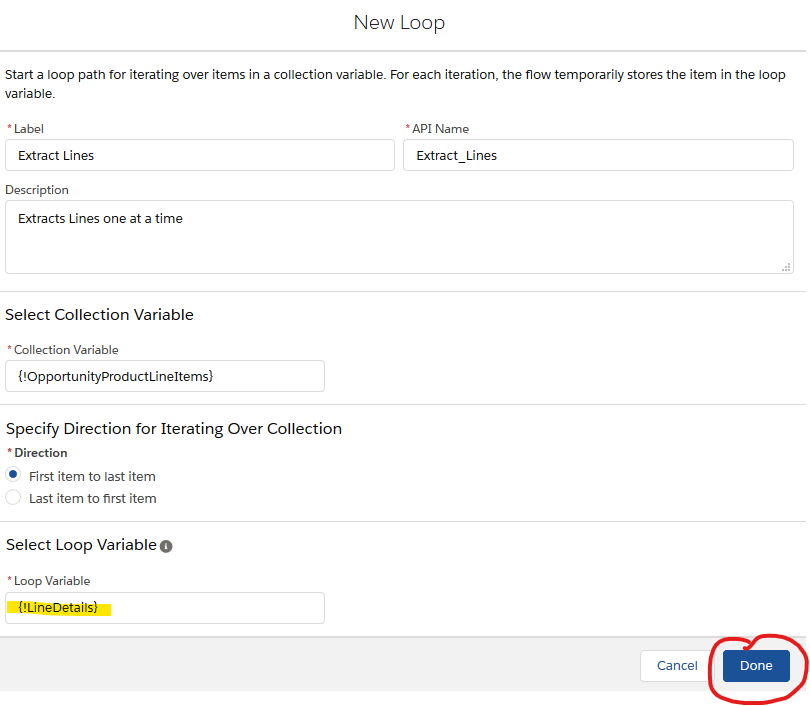
36. After dragging, enter the following data for “Extract Lines” – this loop connector will decide (and control) if there are product lines to consider–if not, then it’s done (if there are, then it enters the loop because “lines exist”).
In the “Select Variable to store Opportunity Product Records” section, we need to create the variable because it’s not already on the list. Select “+ New Resource” to launch the screen:
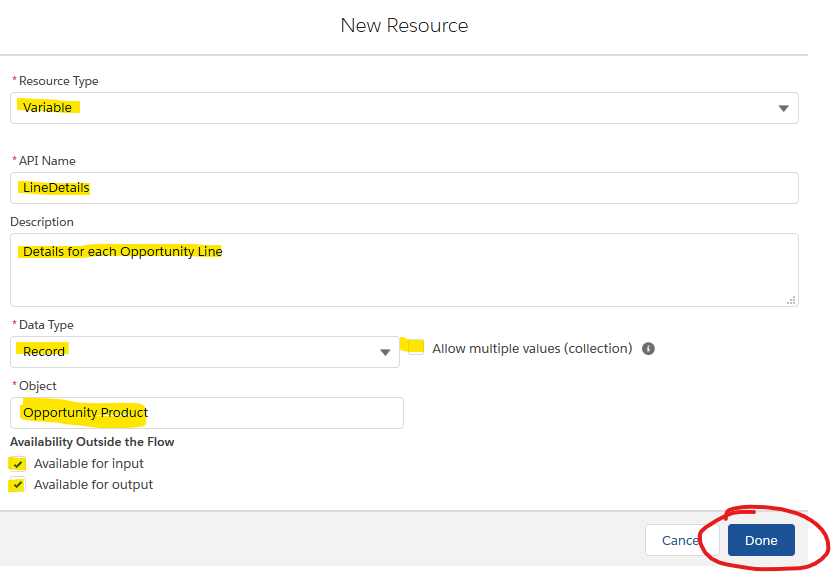
37. In the New Resource screen, we need to create the LineDetails variable to store the source Opportunity’s product lines:
38. Now that the variable is created, on the New Loop screen, select the LineDetails variable:
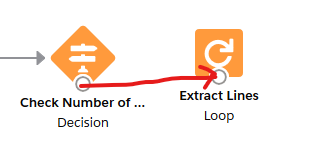
39. Once the Loop connector is saved, you will see it on the canvas to the right of the “Check Number of …” connector. Using your mouse, click/drag from the attachment point on the “Check Number of …” connector to the attachment point on the new connector:
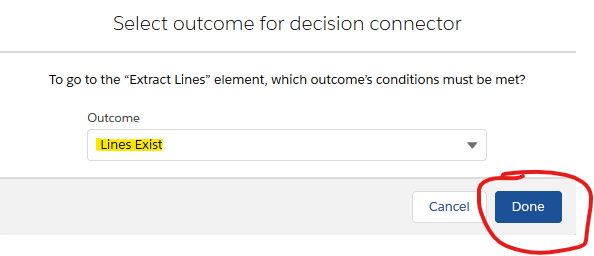
40. This connection requires the assignment of a decision outcome – we choose Lines Exist:
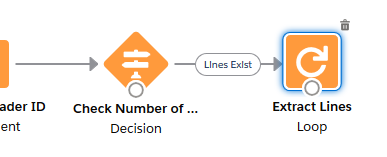
41. You should see a directional flow from the “Check Number of …” connector to the “Extract Lines” connector:
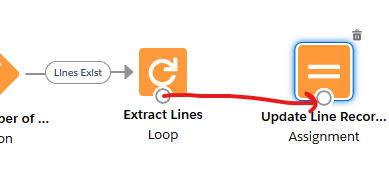
42. Drag a new Assignment connector to the canvas to the right of the “Extract Lines…” connector:
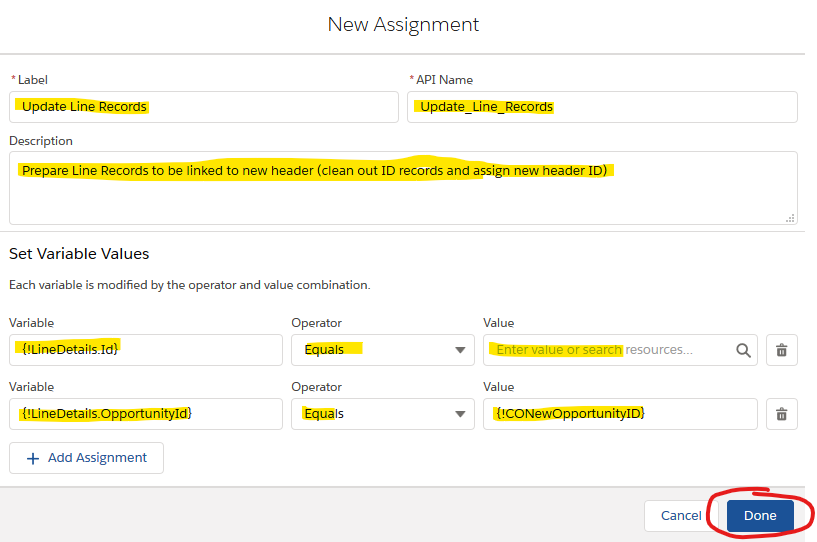
43. After dragging, enter the following data for “Update Line Records” – this connector nulls the line details ID (so new ones will be created) and assigns the newly cloned Opportunity ID to the lines:
44. Once the Assignment connector is saved, you will see it on the canvas to the right of the “Extract Lines” connector. Using your mouse, click/drag from the attachment point on the “Extract Lines” connector to the attachment point on the new connector:
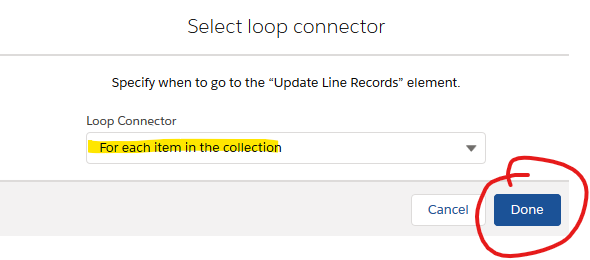
45. This connection requires the assignment of a loop connector logic – we choose For each item in the collection (this causes the loop to execute once per product line):
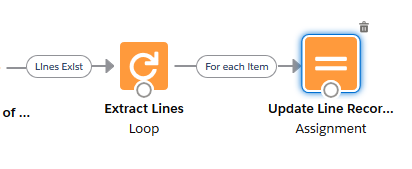
46. You should see a directional flow from the “Extract Lines” connector to the “Update Line Recor…” connector:
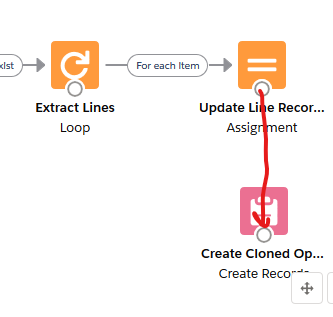
47. Drag a new Create Records connector to the canvas below the “Update Line Recor…” connector:
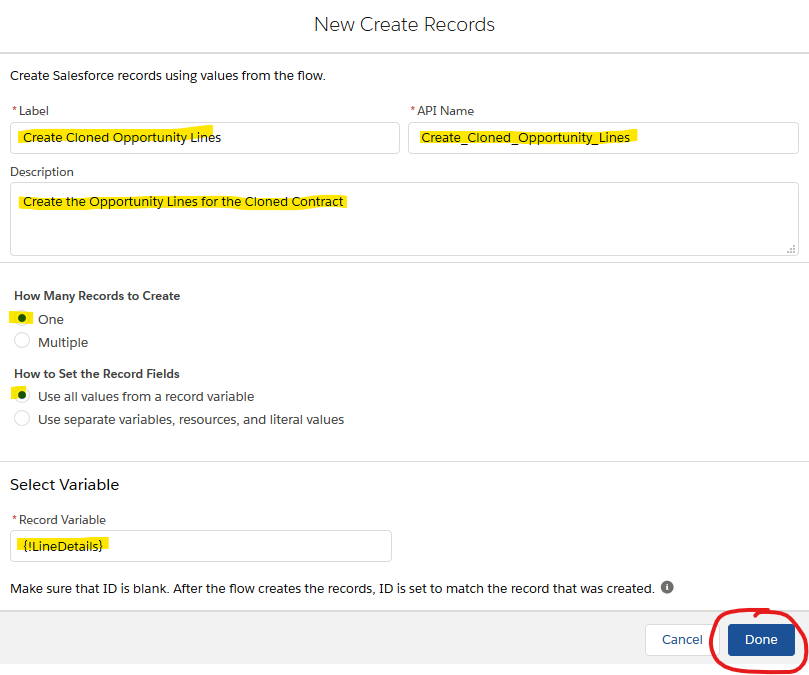
48. After dragging, enter the following data for “Create Cloned Opportunity Lines” – this connector will create a cloned line for the current line in the loop:
49. Once the Create Records connector is saved, you will see it on the canvas below the “Update Line Recor…” connector. Using your mouse, click/drag from the attachment point on the “Update Line Recor…” connector to the attachment point on the new connector:
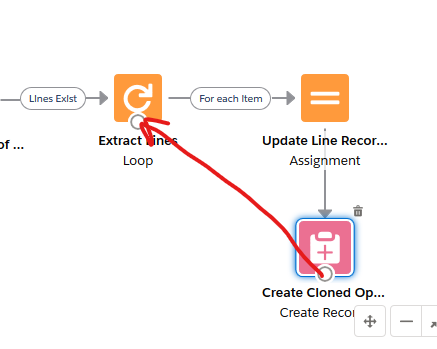
50. Using your mouse, click/drag from the attachment point on the “Create Cloned connector to the attachment point on the “Extract Lines” connector (this closes the loop, causing it to try another line until they’ve all been done):
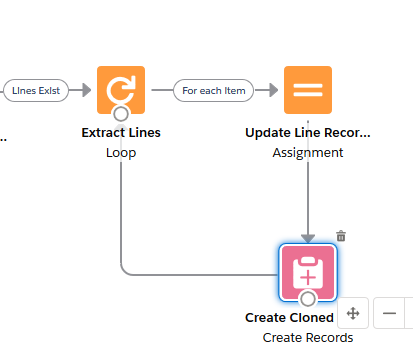
51. You should see a directional flow from the “Update Line Recor…” connector to the “Create Cloned” connector and a closed loop back to the “Extract Lines” connector:
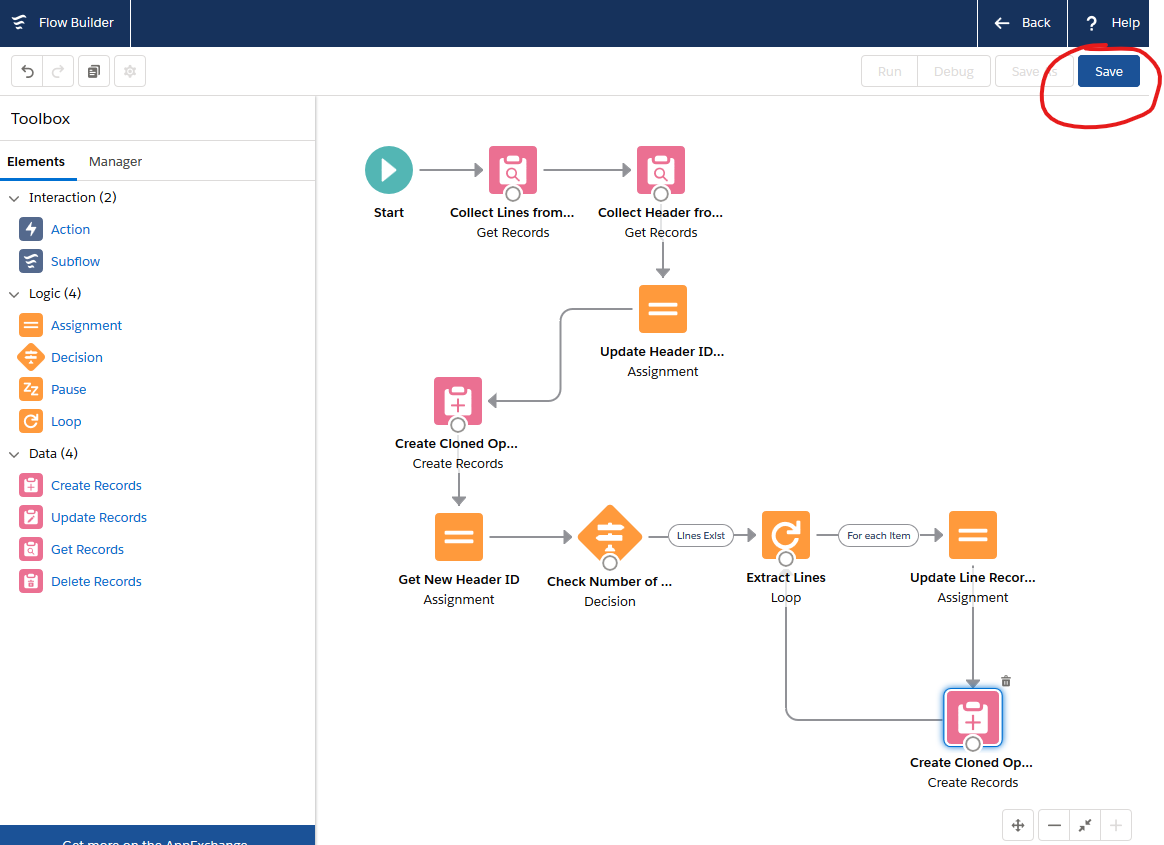
52. The flow is complete, and is ready to save:
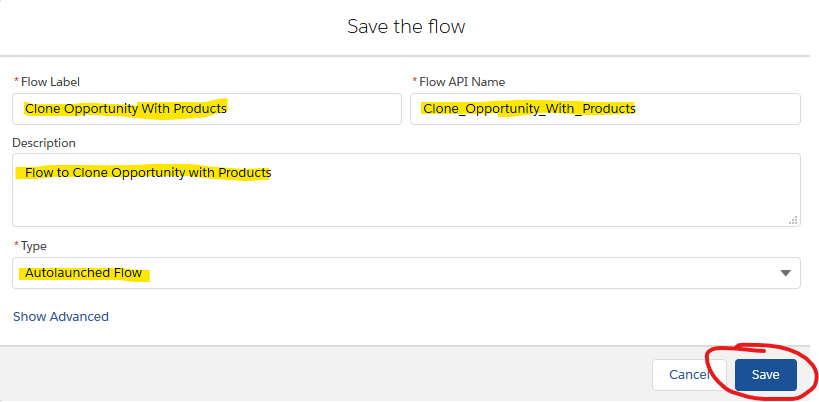
53: Choose the following options to complete the flow:
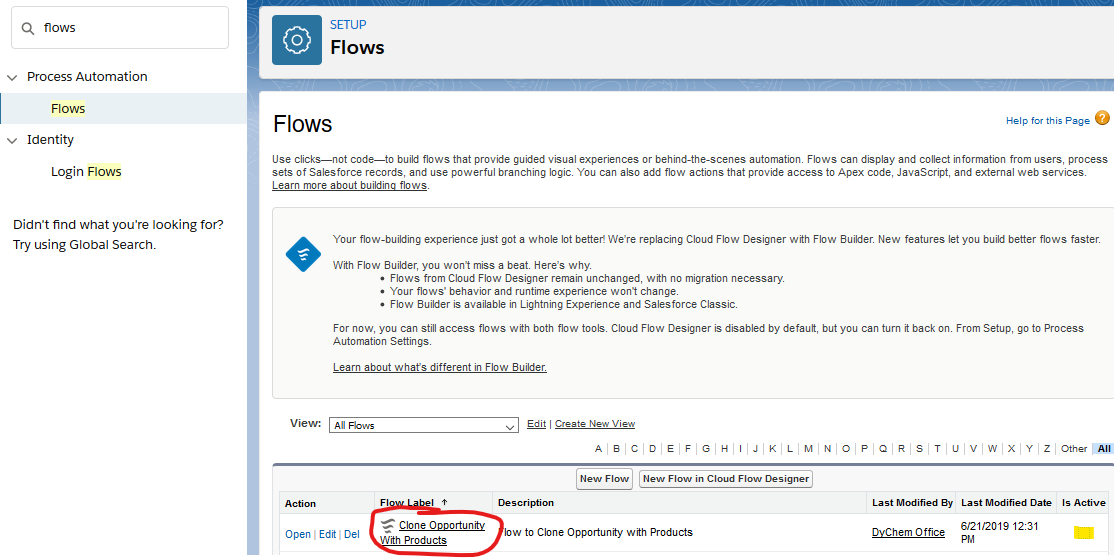
54: We can see the newly created flow. We need to get the URL information from the flow so we can attach it to a button. To find it, we drill down into the flow:
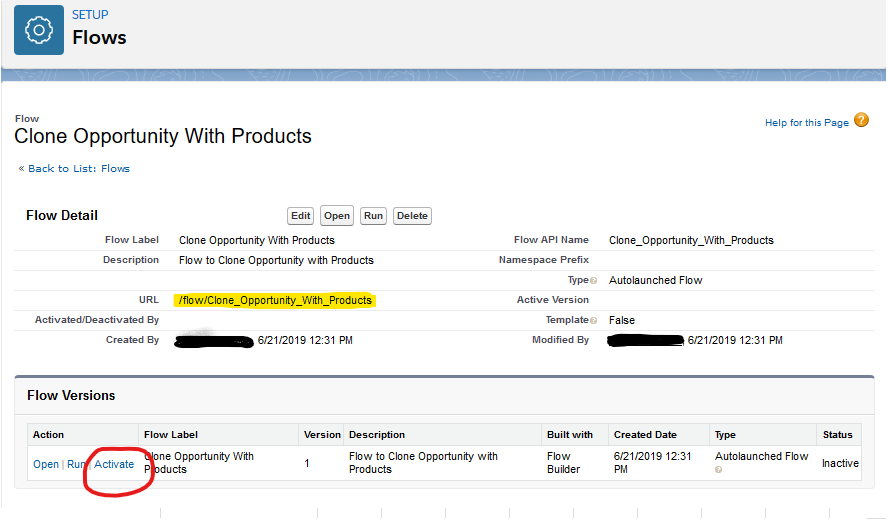
55: We need to copy the URL information (copy the highlighted value to be used in the button) AND we also need to Activate the flow so it can be called:
56: The following cues wo;;”show the active flow, ready to run:
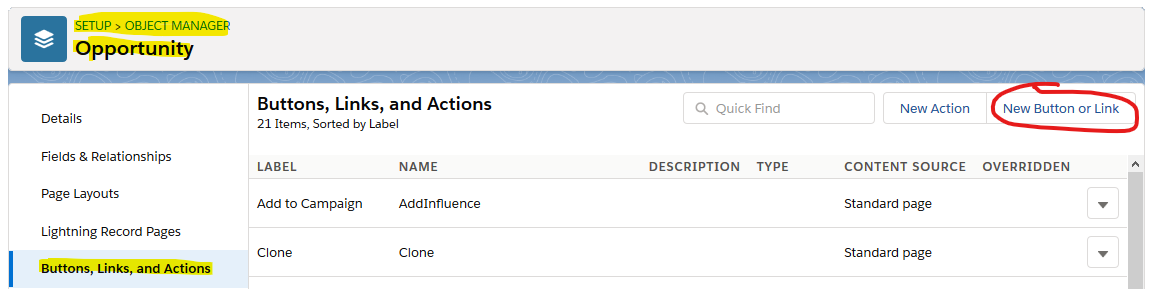
57: In Setup, navigate to the Object Manager, and open up the Opportunity Object. In that screen, choose the Buttons, Links, and Actions list, and use the button for “New Button or Link”:
58. Enter the following information, pasting in the URL information into the lower text box, adding “?recordId={!Opportunity.Id}” to the end of the URL string. Adding this code passes the ID value for an Opportunity to the “recordId” value in the flow–make sure the variable is spelled the same EVERYWHERE:
59. After saving the button, we need to add it to the page layout for Opportunities. Without leaving the Opportunity object in Object Manager, select the Page Layouts tab, and choose your existing layout (or create a new one if you don’t have one already):
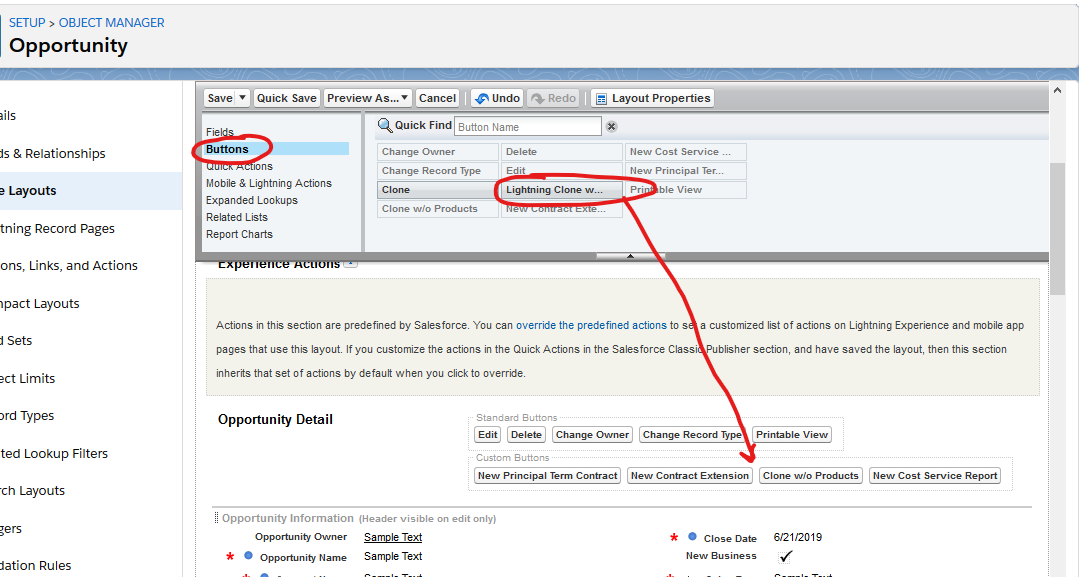
60. Navigate to the “Buttons” section and drag the new button into the appropriate section:
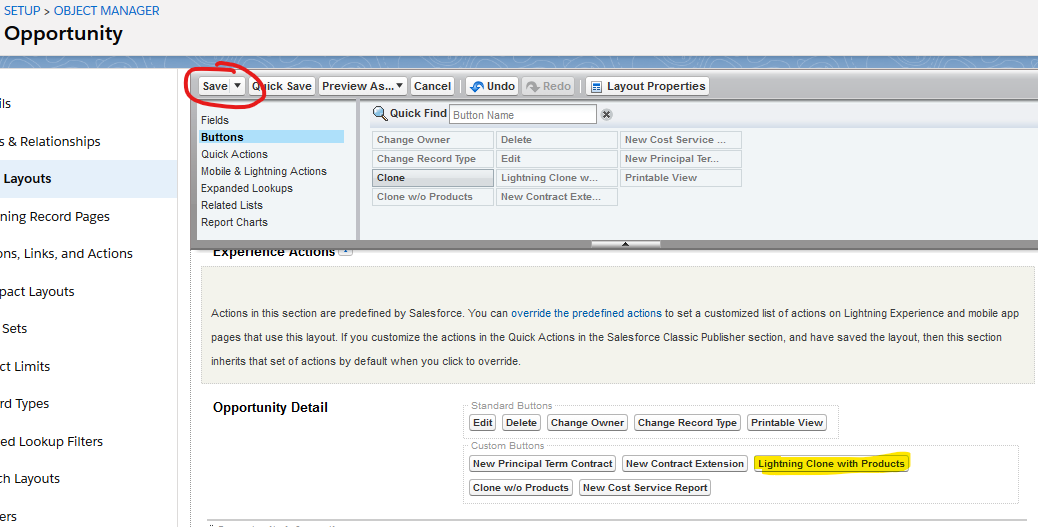
61. Once the button is situated where you like it, use the Save button to save the layout:
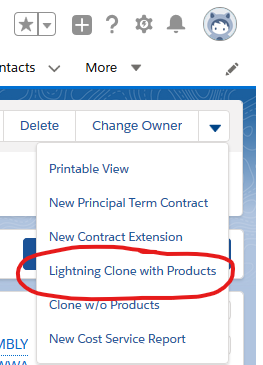
62. Navigate to an existing opportunity you want to clone, and in the custom buttons list, you should see the new button:
63. Clicking this button will show a success (or error screen) similar to this:
If things don’t work perfectly, don’t panic! Try the following:
- Check the email for the admin user–there’s a good chance there are detailed error messages that will give you hints about what might be broken.
- Use the Debug option in the Flow screen–it will allow you to interactively run the flow as you change parameters and it will tell you what happened.
- Double check the spelling (and cAsE) of all variables and objects–they should be consistent. (cAsE and casE are two different variables to Salesforce.)
- Double check the variables in your header and lines–some fields are required, and some can’t be transmitted together (for example, detail lines can have quantity/price or quantity/total, but not quantity/price/total. Salesforce likes to do its own line extension calculation.)
- Let Xcellerated Solutions help you. We would love to troubleshoot and help you perfect this process. Click the button below to contact us.


Hi, I have created this flow, step by step. And rechecked. I’m getting an error
An unhandled fault has occurred while processing the flow. Please contact your system administrator for more information.
And this is what comes in my email: Error element Update_Header_Id_to_NULL (FlowAssignment).
The flow failed to access the value for OldOpportunityHeader.Name because it hasn’t been set or assigned.
and at the bottom: Salesforce Error ID: 760125331-93165 (920611975)
And I had someone who is a more developer type look it over with me and we can’t find the error spot.
Thanks, Patricia
I hit the run button and here is another error message:
Error element Update_Header_Id_to_NULL (FlowAssignment).
The flow couldn’t find the “OldOpportunityHeader” resource.
This sounds like it’s likely an issue with the Special Note from the article (Make sure Step 16 has all the fields required. It looks like OldOpportunityHeader.Name wasn’t mapped–the screen shot only shows 5 fields, but there are at least 4 required fields, Name included):
On the “New Get Records” screen for the Collect Header from Existing Opportunity flow connector, we recommend adding EVERY possible field in the “Select Opportunity Fields to Store in Variable” for the {!OldOpportunityHeader} variable.
If you don’t load it in the list, it won’t get copied. (Start by adding every field, and then remove only the data fields that don’t make sense to copy. You will likely need to add MOST of the fields anyway, so it’s usually easier to focus on removing irrelevant fields.)
Thanks, it was that. Some of the error notifications were less clear but that was it. New Question. How can I make it end up on the Opportunity so User doesn’t have to go look for it. That would be cool.
Thank you for providing this solution and for the great documentation. This could be off great help!
Managed to get it to work after a few errors.
Would be great if it was possible to make it send you to the Opportunity that is created.
We did however manage to send to Account by adding “&retURL={!URLFOR( Opportunity.AccountId)}” to the button.
Or alternavely: a customizable success message explaning what happened : “You sucessfully cloned the opp with products. Find it under the Account”
Note: Unlike the old native “classic” button, you have to ensure there are no validation rule errors on the opp your are cloning (or update the rules)
The old native classic button doesn’t let you clone opps with products where the products are inactive.
Using this flow we got an error message while trying to clone those opps. But only the admin receives the email notification.
Would it be possible to make the cloning work for inactive products or at least tell the user the reason?
Hi,
Interested in hiring influencers to promote your business?
You are invited to sign up with the premium global influencer platform that connects companies with Instagram influencers proven to attract paying traffic, amplified brand exposure and loyal customers.
This agency offers exclusive access to hundreds of influencers in many niches that you can collaborate with for shoutouts to promote your business and watch them turn your brand into a talking point.
You will receive full access to a directory of authorized influencers and advanced analytic tools to track influencer performance and engagement. Membership to our exclusive influencer platform costs only $49 per month. You can opt out at any time!
Would you like to get started?
Learn more here: https://2rjf.mybrandcontact.xyz/o/KqBPHM1S
Yours sincerely,
Moncrieff
Sent from my iPhone
Unsubscribe here: https://2rjf.mybrandcontact.xyz/link/u/KqBPHM1S
Hello,
Thank you for this blog. I have one question though, what if we need an interface in between? Like after you click the Clone button an UI should pop up with all the details auto populated, where it gives the user to change some values like opp name or something? I tried the Screen element from the flow but its not exactly working fine. Any advice? Is there a way to trigger the standard salesforce new record creation page? like when you try to clone using the salesforce provided clone button.(which doesnt clone the products)
Thanks
Manju
My new get records doesnt have the option to select a variable. It just doesn’t show up
Dear!
You are invited to join the leading global influencer agency that connects brands with Instagram influencers, increased brand exposure and long-term customers.
This social agency provides best access to a wealth of influencers in different niches that you can collaborate with for shoutouts to promote your business and watch them turn your brand into a trending topic.
Discover more right here: https://1w1y.influencerapp.xyz/o/M7MJJe4P
Kind concerns,
Spada
REMEMBER.
To Unsubscribe link: https://1w1y.influencerapp.xyz/link/u/M7MJJe4P
-(02) 9943 3579
Hey there…
If You need additional sales, or You simply wish to grow Your business
Our influencer platform is built for You.
We attach You to the influencers whose objective is to get to a targeted audience.
Promo is based on making use of influencers unique web links or sharing material straight to social media.
What do we give?
_ Boosted brand name exposure
_ Boost sales
_ Improved reputation
Fulfilling Your organisation means a bit of financial investment providing development.
It is all about collaboration.
We take Your service to an entire brand-new degree, and more vital is, we are doing that with You.
With each other we can do more.
Find out more: https://pill.4brands.xyz/poincare
Sent out from a mobile. Consistently foiled by autocorrect. But duck it.
Note:
Unsubscribe here: https://pill.4brands.xyz/un/ZDr
You are invited to join the fastest growing global instagram influencer network that connects brands with social media influencer proven to attract engaged traffic, and long-lasting clients.
This platform supplies best connection to dozens of IG influencers in various specific niches that you can work with for shoutouts to market your business and watch them your brand into a talking point.
You will gain access to a directory of high performing influencer and sophisticated analysis tools to track influencer performance & engagement.
Would certainly you like to join?
https://antione.buyshoutout.site/611norcohC
[Eartha] sent the message. apple iphone sent the typos.
67349620-374-0478#67349620-374-0478#
note:
Unsubscribe link: https://antione.buyshoutout.site/li/jennkie
Hi there,
Are you interested in working with social media influencers to advertise your website?
This platform provides exclusive connection to a wealth of social media influencers in various particular niches that you can work with for sponsored posts to promote your product and watch them turn your brand into a viral topic.
You will receive a full catalogue of authorized influencer and sophisticated analysis tools to inspect influencer engagement.
https://nellie.ordershoutout.site/06612tnomerF
Kind concerns,
Hogg
Please excuse any tpyos as it was sent out from my apple iphone.
83700
remember.
abandon //nellie.ordershoutout.site/lost/33n33hc
This didn’t work for me. I mimicked the process to clone a task but in the fast lookup, the process fails to find a record where Id Equals {!recordId} (null). The flow creates the cloned task perfectly fine when I pass the existing task value in to the variable in debug mode but fails when called from a custom button.
Hi Todd, I had the same issue. The flow run perfectly in debug mode but failed when called from the custom button. It was because I missed to add recordId={!Opportunity.Id} to the end of the Button or Link URL (step 58).
For all who received the error message for NULL – Try adding Opportunity ID and Opportunity Name to the step 2 (Collect Lines from Existing Opportunity). It worked for me.
Hi, I am getting ‘Error Occurred: Action name not found’ message. Could you please help.
Hey…
You are welcomed to join the leading global Instagram influencer platform that connects companies with IG influencers, and long-lasting customers.
Beginning now your cost-free 7 day test!
You will gain a full directory of high performing influencer and sophisticated analysis tools to examine influencer engagement.
https://pxl2.brandnetwork.xyz/o/23945etrelA
Best,
Heather, Pitt
[Heather] sent the message. iPhone sent out the typos.
49-300xserpconsulting.com49-30049-300
To abort pxl2.brandnetwork.xyz/link/u/nosn33j
Great post. One item I cannot get past is retrieving values from a picklist: Specifically, ‘Opportunity Stage’. If I don’t hard-code this value and assign it to a (single record) text variable (I used {!OldOpportunityHeader.StageName}) at the ‘Assignment: Update Header ID to NULL’, the flow will error with the following message: “Error Occurred: This error occurred when the flow tried to create records: REQUIRED_FIELD_MISSING: Required fields are missing: [StageName]. ” I have selected ‘Field: StageName’ in the ‘Get Records: Collect Header from Existing Opportunity’ connector, and DEBUG claims to have recorded it, but I cannot assign it during the ‘Create Records: Create Cloned Opportunity’ connector. How do you dynamically pass values for the required picklist ‘Stage’ to the ‘Create Records: Create Cloned Opportunity’ connector?